Raspberry Pi VPC Network Example: The Ultimate Guide For DIY Tech Enthusiasts
Hey there, tech wizards and coding ninjas! Are you ready to dive into the world of Raspberry Pi and VPC networks? If you're looking for a Raspberry Pi VPC network example to help you get started, you're in the right place. In this guide, we’ll break down everything you need to know about setting up your own Virtual Private Cloud (VPC) using Raspberry Pi. No fancy jargon, just pure knowledge served with a side of fun!
Picture this: you’ve got your Raspberry Pi sitting on your desk, blinking its little lights like a mini spaceship. But what if you could turn that tiny device into a powerhouse for managing your own private cloud network? Sounds cool, right? Well, buckle up because we’re about to show you how to do exactly that. This guide will walk you through the entire process step by step, so even if you’re a beginner, you’ll be good to go.
Before we jump into the nitty-gritty, let’s address the elephant in the room. Why should you care about Raspberry Pi VPC networks? Well, apart from being an awesome project to impress your friends, setting up a VPC on Raspberry Pi can help you create a secure, isolated environment for your applications. Whether you’re building a home server, running a small business, or just tinkering around, this setup can save you tons of money and headaches. So, are you ready to become a Raspberry Pi VPC master?
Read also:Maripily Rivera Net Worth The Rise Of A Global Sensation
What is Raspberry Pi VPC Network?
Alright, let’s start with the basics. A Raspberry Pi VPC network is essentially a Virtual Private Cloud (VPC) that runs on your Raspberry Pi. Think of it as your own mini cloud where you can host applications, store data, and even run services like a web server or database. The beauty of VPC is that it gives you complete control over your network settings, security groups, and subnets—all on a device that fits in the palm of your hand.
Here’s why Raspberry Pi VPC networks are awesome:
- Cost-effective: You don’t need expensive hardware to run a VPC.
- Flexible: Customize your network settings to suit your needs.
- Secure: Isolate your applications and data from the public internet.
- Fun: Let’s be honest, building your own VPC is just plain cool!
Why Use Raspberry Pi for VPC?
Now, you might be wondering, why Raspberry Pi? Why not just use a regular computer or a cloud service? Well, here’s the deal. Raspberry Pi is small, affordable, and energy-efficient. It’s perfect for hobbyists, students, and small businesses who want to experiment with cloud computing without breaking the bank.
Plus, Raspberry Pi has a massive community of developers and enthusiasts who are always sharing tips, tricks, and projects. So, if you run into any issues, chances are someone else has already solved it and written a tutorial about it. And speaking of tutorials…
Step-by-Step Raspberry Pi VPC Network Example
Let’s get our hands dirty and set up a Raspberry Pi VPC network. Don’t worry if you’re new to this; we’ll guide you through each step with clear instructions and screenshots. Here’s what you’ll need:
- Raspberry Pi (any model will do, but Pi 4 is recommended for better performance).
- A microSD card with Raspberry Pi OS installed.
- An Ethernet cable or Wi-Fi dongle.
- A keyboard and monitor (optional if you’re using SSH).
Step 1: Set Up Your Raspberry Pi
First things first, you need to set up your Raspberry Pi. If you haven’t done this before, don’t panic. It’s super easy. Just download the Raspberry Pi Imager from the official website, plug in your microSD card, and follow the instructions to install Raspberry Pi OS.
Read also:Aagmaal Come Your Ultimate Guide To Understanding The Phenomenon
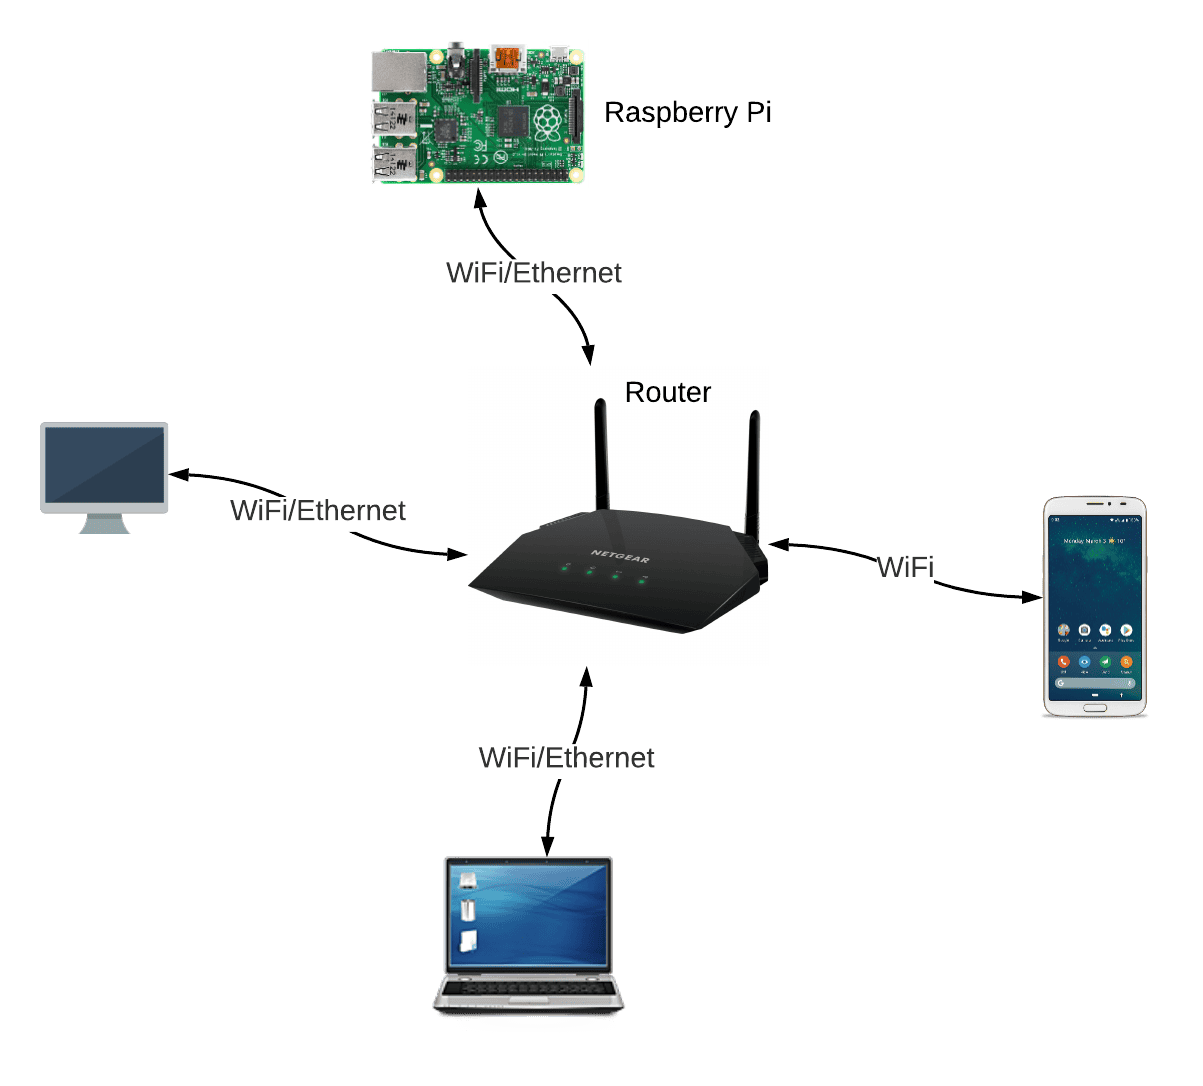
Once your Pi is up and running, make sure it’s connected to the internet. You can use either an Ethernet cable or Wi-Fi. If you’re using Wi-Fi, go to the Raspberry Pi Configuration tool and enter your network credentials.
Step 2: Install Docker
Now that your Pi is ready, it’s time to install Docker. Docker is a containerization platform that makes it easy to deploy and manage applications. To install Docker, open the terminal and run the following commands:
sudo apt update
sudo apt install docker.io
Once Docker is installed, you can test it by running:
docker run hello-world
Step 3: Create a VPC Network
With Docker installed, you can now create your VPC network. In Docker, a network is essentially a virtual subnet where your containers can communicate with each other. To create a new network, run the following command:
docker network create my_vpc
That’s it! You’ve just created your own VPC network. You can verify it by running:
docker network ls
Step 4: Launch Containers
Now that your VPC network is set up, it’s time to launch some containers. For example, you can run a simple web server using the following command:
docker run -d --name my_web_server --network my_vpc nginx
This will launch an NGINX web server in your VPC network. You can access it by running:
docker inspect -f '{{range .NetworkSettings.Networks}}{{.IPAddress}}{{end}}' my_web_server
This will give you the IP address of your container. You can then open a web browser and enter the IP address to see your web server in action.
Best Practices for Raspberry Pi VPC Networks
Now that you’ve set up your Raspberry Pi VPC network, here are some best practices to keep in mind:
- Use strong passwords and enable SSH key authentication for added security.
- Regularly update your Raspberry Pi OS and Docker to ensure you have the latest security patches.
- Monitor your network traffic to detect any suspicious activity.
- Back up your data regularly to prevent data loss.
Common Issues and Troubleshooting
Even the best-laid plans can go awry sometimes. Here are some common issues you might encounter when setting up a Raspberry Pi VPC network and how to fix them:
Issue 1: Docker Not Running
If Docker isn’t running, try restarting the service:
sudo systemctl restart docker
Issue 2: Network Connectivity Problems
If your containers can’t communicate with each other, check your network settings:
docker network inspect my_vpc
Issue 3: Insufficient Resources
If your Raspberry Pi is running slow, try closing unnecessary applications or upgrading your hardware.
Real-World Applications of Raspberry Pi VPC Networks
So, what can you actually do with a Raspberry Pi VPC network? Here are a few ideas:
- Host a personal website or blog.
- Run a home automation system.
- Set up a private cloud storage solution.
- Develop and test applications in an isolated environment.
Future Trends in Raspberry Pi VPC Networks
As technology continues to evolve, so do the possibilities for Raspberry Pi VPC networks. Here are a few trends to watch out for:
- Edge computing: With the rise of IoT devices, Raspberry Pi VPC networks can play a key role in processing data at the edge.
- AI and machine learning: Raspberry Pi is becoming increasingly popular for running AI and machine learning models.
- 5G integration: As 5G networks become more widespread, Raspberry Pi VPC networks could be used to create low-latency applications.
Conclusion
And there you have it, folks! A comprehensive guide to setting up a Raspberry Pi VPC network. From understanding the basics to troubleshooting common issues, we’ve covered everything you need to know to get started. Remember, the key to success is practice. So, don’t be afraid to experiment and try new things.
Before you go, here’s a quick recap of what we’ve learned:
- Raspberry Pi VPC networks are awesome for creating secure, isolated environments.
- Setting up a VPC on Raspberry Pi is easy with Docker.
- Follow best practices to ensure your network is secure and efficient.
Now it’s your turn! Share your Raspberry Pi VPC network projects in the comments below. And if you found this guide helpful, don’t forget to share it with your friends. Happy tinkering, and see you in the next one!
Table of Contents
- Raspberry Pi VPC Network Example: The Ultimate Guide for DIY Tech Enthusiasts
- What is Raspberry Pi VPC Network?
- Why Use Raspberry Pi for VPC?
- Step-by-Step Raspberry Pi VPC Network Example
- Step 1: Set Up Your Raspberry Pi
- Step 2: Install Docker
- Step 3: Create a VPC Network
- Step 4: Launch Containers
- Best Practices for Raspberry Pi VPC Networks
- Common Issues and Troubleshooting
- Real-World Applications of Raspberry Pi VPC Networks
- Future Trends in Raspberry Pi VPC Networks
- Conclusion


