RemoteIoT VPC SSH Raspberry Pi Review: The Ultimate Guide For Tech Enthusiasts
Let’s be real, folks. The world of remote IoT and Raspberry Pi has become a playground for tech wizards and hobbyists alike. If you're looking to dive deep into the realm of RemoteIoT VPC SSH configurations for your Raspberry Pi, you’ve come to the right place. This isn’t just a review—it’s a guide, a walkthrough, and a treasure map all rolled into one. Buckle up, because we’re about to take a ride through the ins and outs of this powerful setup.
Nowadays, connecting remotely to your Raspberry Pi using SSH inside a Virtual Private Cloud (VPC) has become a necessity, especially for those who want to manage IoT devices from anywhere in the world. It’s not just about convenience; it’s about control, security, and scalability. Whether you’re a seasoned pro or just starting out, understanding how RemoteIoT VPC SSH works is a game-changer.
But hold up! Before we get into the nitty-gritty, let me assure you that this isn’t just another boring tech article. We’re going to break it down in a way that’s easy to digest, packed with real-world examples, and maybe even a touch of humor. So, if you’re ready to level up your tech game, let’s jump right in.
Read also:Ami Dolenz Net Worth The Story Behind The Numbers
Here’s a quick table of contents to help you navigate:
- Introduction to RemoteIoT VPC SSH
- Raspberry Pi Basics
- Setting Up a VPC
- What is SSH?
- Understanding RemoteIoT
- Step-by-Step Guide
- Security Best Practices
- Troubleshooting Tips
- Performance Optimization
- Wrapping It Up
Introduction to RemoteIoT VPC SSH
Alright, let’s start with the basics. RemoteIoT VPC SSH might sound like a mouthful, but it’s actually pretty straightforward once you break it down. Think of it like this: RemoteIoT is the framework that allows you to connect to your IoT devices remotely. VPC, or Virtual Private Cloud, is your secure little corner of the internet where all your devices can communicate safely. And SSH? That’s the protocol that lets you control your Raspberry Pi from anywhere in the world.
In today’s world, having a secure and reliable way to manage your IoT devices is crucial. Whether you’re running a smart home system, a weather station, or even a drone, being able to access and control these devices remotely can save you a ton of time and effort. And that’s exactly what RemoteIoT VPC SSH brings to the table.
Raspberry Pi Basics
Before we dive into the RemoteIoT VPC SSH setup, let’s talk a little bit about the star of the show: the Raspberry Pi. For those who might be new to this, the Raspberry Pi is a small, affordable computer that can be used for a wide range of projects, from home automation to robotics.
Why Use Raspberry Pi?
Here are a few reasons why the Raspberry Pi is such a popular choice for IoT projects:
- Cost-effective: You don’t need to break the bank to get started.
- Flexible: It can run a variety of operating systems and software.
- Community support: There’s a massive community of users who are always willing to help.
So, whether you’re building a smart thermostat or a security camera, the Raspberry Pi is a solid choice.
Read also:Is Luke Wilson Married The Truth Behind His Relationship Status
Setting Up a VPC
Now, let’s talk about the VPC. A Virtual Private Cloud is essentially a private network that you can create within a public cloud provider like AWS or Google Cloud. It’s like having your own little slice of the internet where you can control who gets access and what they can do.
Steps to Set Up a VPC
Here’s a quick rundown of how you can set up a VPC:
- Choose a cloud provider (AWS, Google Cloud, Azure, etc.).
- Create a new VPC and define your subnets and IP ranges.
- Set up security groups to control inbound and outbound traffic.
- Launch an instance (like your Raspberry Pi) inside the VPC.
It might sound complicated, but trust me, once you’ve done it a few times, it becomes second nature.
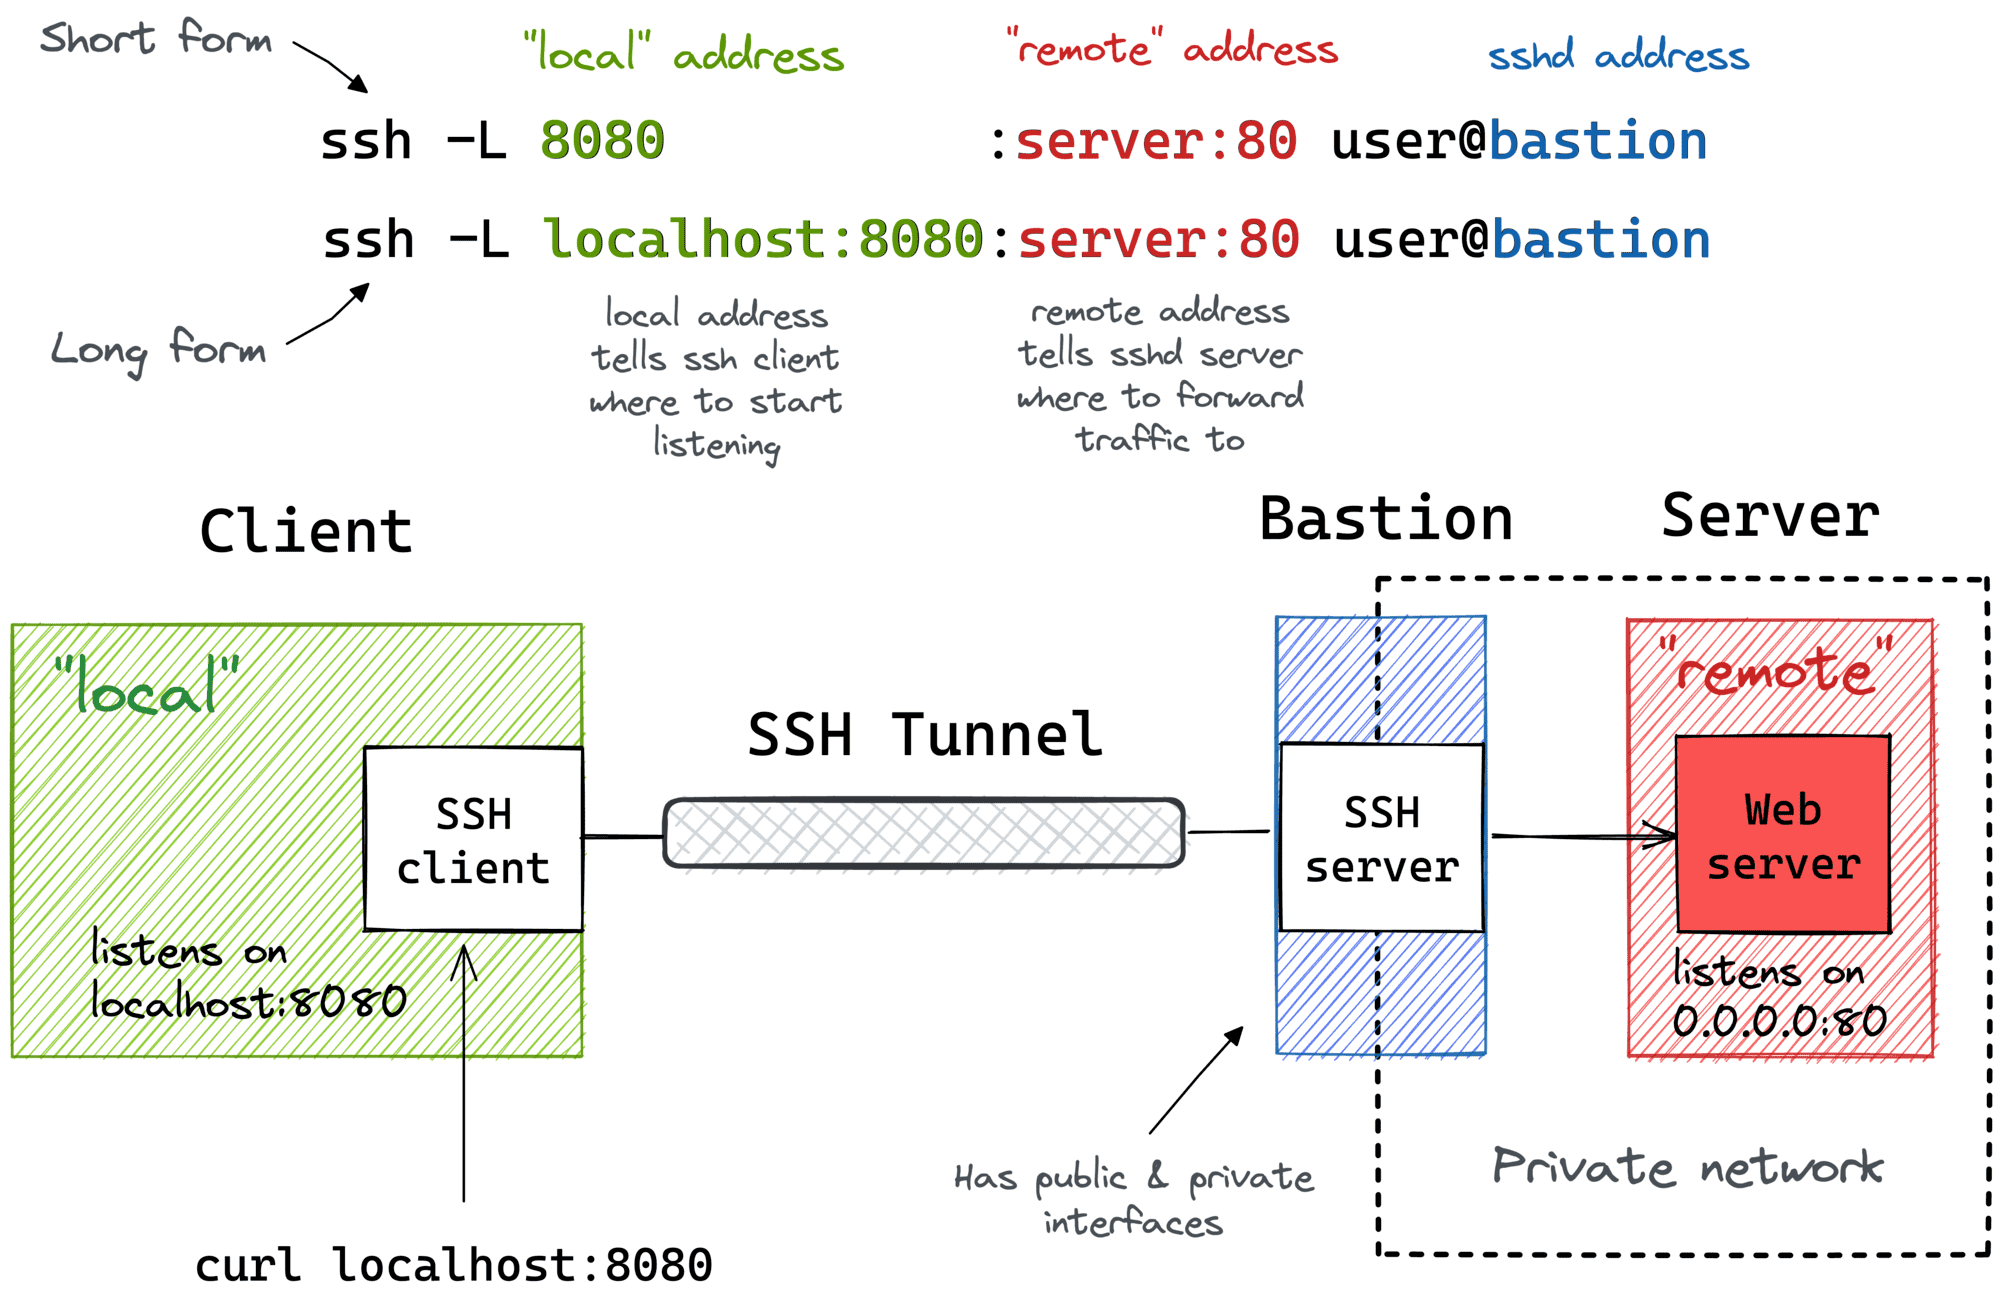
What is SSH?
SSH, or Secure Shell, is a cryptographic network protocol that allows you to securely connect to remote devices. Think of it like a secure tunnel that lets you send commands and transfer files without worrying about prying eyes.
When it comes to Raspberry Pi, SSH is your best friend. It allows you to control your Pi from anywhere in the world, as long as you have an internet connection. Plus, it’s super easy to set up. All you need to do is enable SSH on your Pi and configure your firewall rules.
Understanding RemoteIoT
Now, let’s talk about RemoteIoT. This is the framework that ties everything together. It allows you to connect to your IoT devices remotely, whether they’re inside your VPC or out in the wild. With RemoteIoT, you can monitor sensors, control actuators, and even update firmware—all from the comfort of your couch.
One of the coolest things about RemoteIoT is its flexibility. You can use it with a variety of devices and protocols, making it a great choice for both small-scale and large-scale projects.
Step-by-Step Guide
Alright, let’s put it all together. Here’s a step-by-step guide to setting up RemoteIoT VPC SSH on your Raspberry Pi:
Step 1: Set Up Your Raspberry Pi
First things first, you need to get your Raspberry Pi up and running. This involves installing an operating system (like Raspberry Pi OS), configuring your Wi-Fi, and enabling SSH.
Step 2: Create a VPC
Next, head over to your cloud provider of choice and create a new VPC. Make sure to define your subnets and IP ranges carefully, as this will determine how your devices communicate with each other.
Step 3: Configure SSH
Once your VPC is set up, it’s time to configure SSH. This involves setting up your SSH keys, configuring your firewall rules, and testing your connection.
Step 4: Connect to RemoteIoT
Finally, connect your Raspberry Pi to RemoteIoT. This might involve installing some additional software or configuring your device settings. Don’t worry, the RemoteIoT documentation is pretty comprehensive, so you should be able to figure it out without too much trouble.
Security Best Practices
Security is a big deal when it comes to remote IoT setups. Here are a few best practices to keep in mind:
- Use strong passwords: Avoid using common passwords or ones that are easy to guess.
- Enable two-factor authentication: This adds an extra layer of security to your SSH connections.
- Keep your software up to date: Regularly update your operating system and any software you’re using.
By following these best practices, you can help protect your devices from unauthorized access and potential threats.
Troubleshooting Tips
Even the best-laid plans can go awry sometimes. Here are a few troubleshooting tips to help you out:
- Check your network settings: Make sure your Pi is connected to the right network and that your VPC settings are correct.
- Verify your SSH keys: Double-check that your SSH keys are set up correctly and that your firewall rules allow SSH traffic.
- Consult the logs: If something isn’t working, check the system logs for clues as to what might be going wrong.
With a little patience and perseverance, you should be able to get everything up and running in no time.
Performance Optimization
Finally, let’s talk about performance. There are a few things you can do to optimize the performance of your RemoteIoT VPC SSH setup:
- Use a fast internet connection: This will help reduce latency and improve overall performance.
- Compress your data: If you’re transferring large amounts of data, consider compressing it to save bandwidth.
- Monitor your resources: Keep an eye on your CPU and memory usage to make sure your Pi isn’t getting overloaded.
By optimizing your setup, you can ensure that your devices are running smoothly and efficiently.
Wrapping It Up
And there you have it, folks. A comprehensive guide to setting up RemoteIoT VPC SSH on your Raspberry Pi. Whether you’re a seasoned pro or just starting out, I hope this article has given you the tools and knowledge you need to take your IoT projects to the next level.
Now, here’s the fun part: I want to hear from you! Have you tried setting up RemoteIoT VPC SSH before? What challenges did you face, and how did you overcome them? Leave a comment below and let’s start a conversation. And if you found this article helpful, don’t forget to share it with your friends and colleagues. Until next time, happy tinkering!


