Mastering Raspberry Pi Remote Control IoT App: Your Ultimate Guide
Imagine this: You’re chilling on your couch, sipping your favorite coffee, and suddenly you want to adjust the thermostat or turn off the lights in your bedroom. Sounds like a hassle, right? Wrong! With the power of Raspberry Pi remote control IoT apps, you can manage your entire smart home setup from the palm of your hand. It’s not just about convenience; it’s about transforming your living space into a futuristic hub of automation and efficiency.
Now, let’s break it down for you. If you’ve ever wondered how Raspberry Pi can revolutionize the way you interact with your gadgets, you’re in the right place. In this guide, we’ll dive deep into the world of Raspberry Pi remote control IoT apps and show you how to harness its full potential. Whether you’re a tech enthusiast or a complete beginner, this article is packed with actionable insights and tips.
From setting up your first project to troubleshooting common issues, we’ve got you covered. By the end of this read, you’ll be ready to build your own IoT app and take control of your smart home. So, buckle up and let’s get started!
Read also:Best Raspberry Pi Remote Iot Software Unlock Your Smart Home Potential
Table of Contents:
- What is Raspberry Pi?
- Raspberry Pi Remote Control IoT App Explained
- Getting Started with Raspberry Pi
- Setup Guide for Your First IoT App
- Choosing the Right Tools and Software
- Cool Project Ideas for Raspberry Pi IoT
- Troubleshooting Common Issues
- Security Tips for Your IoT App
- Further Learning Resources
- Wrapping It Up
What is Raspberry Pi?
Let’s kick things off by talking about the star of the show: Raspberry Pi. Think of it as a tiny but mighty computer that fits in the palm of your hand. It’s not just any computer, though. Raspberry Pi is specifically designed for makers, hobbyists, and developers who want to experiment with coding, robotics, and yes, IoT apps.
Here’s why Raspberry Pi is so popular:
- It’s super affordable – you can get one for under $50.
- It’s versatile, meaning you can use it for everything from home automation to building robots.
- It has a massive community of users who share tutorials, projects, and tips.
So, whether you’re a tech wizard or just starting out, Raspberry Pi is the perfect companion for your IoT adventures. And trust me, once you dive in, you’ll be hooked!
Raspberry Pi Remote Control IoT App Explained
Now, let’s talk about the main event: Raspberry Pi remote control IoT apps. These apps allow you to control various devices and systems remotely, all thanks to the power of the internet. Imagine being able to monitor your home security system, adjust your smart thermostat, or even feed your pet fish – all from your smartphone or tablet.
Here’s how it works:
Read also:Sabirah Lohn Twitter The Ultimate Guide To Her Rise Influence And Impact
- You set up your Raspberry Pi with the necessary hardware and software.
- You connect it to your home network via Wi-Fi or Ethernet.
- You develop an IoT app that communicates with your devices.
- Finally, you control everything from a user-friendly interface on your mobile device.
The beauty of Raspberry Pi remote control IoT apps is that they’re customizable. You can tailor them to fit your specific needs and preferences. Whether you’re building a simple smart light switch or a complex home automation system, the possibilities are endless.
Why Should You Care About IoT Apps?
IoT apps aren’t just a cool tech trend; they’re a game-changer for modern living. They help you save time, energy, and money while enhancing your overall quality of life. Plus, who doesn’t love the convenience of controlling their world with just a few taps on their phone?
Getting Started with Raspberry Pi
Alright, let’s get practical. If you’re new to Raspberry Pi, don’t worry – we’ll walk you through the basics. First things first, you’ll need a few essentials:
- A Raspberry Pi board (we recommend the Raspberry Pi 4 for its speed and capabilities).
- A microSD card with at least 16GB of storage.
- A power supply that matches your Raspberry Pi model.
- A keyboard, mouse, and monitor (or you can use remote access).
Once you have everything, it’s time to install the operating system. Raspberry Pi OS is the go-to choice for most users, but there are other options like Ubuntu or Raspbian if you prefer something different.
Pro Tip: If you’re planning to build an IoT app, consider using a lightweight OS like DietPi. It’s optimized for performance and perfect for resource-intensive projects.
Setup Guide for Your First IoT App
Now that you’ve got your Raspberry Pi up and running, it’s time to create your first IoT app. Here’s a step-by-step guide to get you started:
Step 1: Choose Your Project
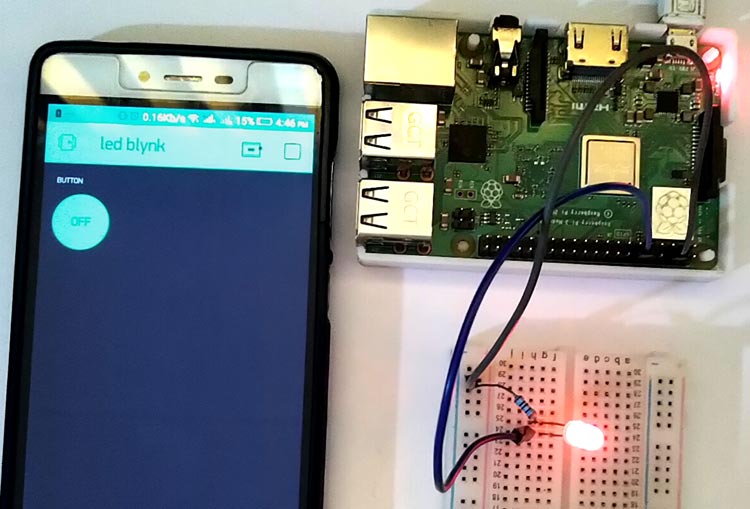
Pick something simple to start with. A good idea is to build a smart light controller. All you need is a few LEDs, a breadboard, and some wires. This will help you understand the basics of GPIO (General Purpose Input/Output) pins and how they interact with your app.
Step 2: Install Necessary Software
For this project, you’ll need:
- Python (Raspberry Pi OS comes with Python pre-installed).
- The RPi.GPIO library for controlling GPIO pins.
- Flask or another web framework to create your app’s interface.
Pro Tip: Use pip to install Flask by running the command pip install flask.
Step 3: Write Your Code
Here’s a quick example of how to control an LED using Flask:
python
from flask import Flask, render_template, request
import RPi.GPIO as GPIO
app = Flask(__name__)
GPIO.setmode(GPIO.BCM)
GPIO.setup(18, GPIO.OUT)
@app.route("/")
def home():
return render_template("index.html")
@app.route("/toggle")
def toggle():
GPIO.output(18, not GPIO.input(18))
return "LED toggled!"
if __name__ =="__main__":
app.run(host="0.0.0.0", port=80)
Save this code in a file called app.py and run it using the command python app.py. You can then access your app by typing your Raspberry Pi’s IP address in your browser.
Choosing the Right Tools and Software
When it comes to building Raspberry Pi remote control IoT apps, having the right tools is crucial. Here’s a list of must-haves:
- Programming Language: Python is the most popular choice due to its simplicity and extensive libraries.
- Web Framework: Flask or Django for creating your app’s interface.
- Database: SQLite for small projects or MySQL for larger ones.
- Security Tools: Use HTTPS and authentication methods to protect your app.
Remember, the tools you choose will depend on the complexity of your project and your personal preferences. Don’t be afraid to experiment and find what works best for you.
Cool Project Ideas for Raspberry Pi IoT
Feeling inspired? Here are some awesome project ideas to try:
- Smart Home Automation System
- Weather Station with Real-Time Data
- Personal Assistant with Voice Commands
- Smart Garden with Automated Watering
- DIY Security Camera
Each of these projects can be customized to suit your needs and skill level. Plus, they’re all great ways to showcase your Raspberry Pi remote control IoT app-building skills.
Troubleshooting Common Issues
Even the best-laid plans can go awry sometimes. Here are some common issues you might encounter and how to fix them:
- Connection Problems: Make sure your Raspberry Pi is connected to the same network as your devices.
- Code Errors: Double-check your syntax and ensure all libraries are installed correctly.
- Hardware Malfunctions: Verify that all components are properly connected and powered.
If you’re stuck, don’t hesitate to reach out to the Raspberry Pi community for help. There’s always someone willing to lend a hand.
Security Tips for Your IoT App
Security is a top priority when it comes to IoT apps. Here are some tips to keep your app safe:
- Use strong passwords and enable two-factor authentication.
- Regularly update your software and firmware.
- Encrypt sensitive data and communications.
By following these best practices, you can ensure that your Raspberry Pi remote control IoT app is both functional and secure.
Further Learning Resources
Ready to take your skills to the next level? Here are some resources to help you deepen your knowledge:
- Raspberry Pi Official Documentation
- Flask Documentation
- IoT Tutorials on YouTube
- Online Courses on Udemy or Coursera
Remember, the more you learn, the more you can achieve with your Raspberry Pi remote control IoT apps.
Wrapping It Up
And there you have it – your ultimate guide to mastering Raspberry Pi remote control IoT apps. From setting up your first project to exploring advanced features, we’ve covered everything you need to know. So, what are you waiting for? Grab your Raspberry Pi, fire up your creativity, and start building your dream IoT app today!
Don’t forget to share your experiences and projects in the comments below. And if you found this article helpful, be sure to check out our other guides on all things tech. Happy building, and see you in the next one!


