Mastering RemoteIoT VPC Network On Raspberry Pi With Free AWS Services
Hey there tech enthusiasts, if you're diving into the world of IoT and cloud computing, you've probably heard about remoteIoT VPC network and how it can transform your Raspberry Pi projects. But hold up, what if I told you there’s a way to set this up for free using AWS? Yeah, you read that right—FREE! Today, we’re going to break down everything you need to know about creating a robust remoteIoT VPC network on your trusty Raspberry Pi while leveraging the power of AWS Free Tier. This isn’t just another tech article; it’s your ultimate guide to taking your IoT game to the next level.
Before we dive deep, let’s get something straight—IoT isn’t just for big corporations anymore. With tools like Raspberry Pi and AWS, even hobbyists and small businesses can build scalable, secure, and cost-effective IoT solutions. Setting up a remoteIoT VPC network might sound intimidating, but trust me, by the end of this article, you’ll have all the knowledge you need to make it happen. So grab your favorite beverage, sit back, and let’s get started!
Oh, and don’t worry if you’re new to all this jargon. We’ll walk you through step by step, breaking down complex terms into bite-sized pieces. By the time you finish reading, not only will you understand how to set up a remoteIoT VPC network, but you’ll also learn why it matters and how it can benefit your projects in the long run. Let’s roll!
Read also:Hdhubu4 The Ultimate Guide To A Gamechanging Platform
Table of Contents
- What is RemoteIoT VPC Network?
- Raspberry Pi Basics for IoT
- Understanding AWS Free Tier
- Why Use VPC for RemoteIoT?
- Setting Up Your VPC Network
- Connecting Raspberry Pi to VPC
- Securing Your RemoteIoT Network
- Optimizing Performance
- Real-World Applications
- Troubleshooting Tips
What is RemoteIoT VPC Network?
Alright, first things first—let’s define what we’re talking about here. A RemoteIoT VPC network refers to a virtual private cloud (VPC) environment specifically designed for remote IoT devices. Think of it as a secure, isolated space where your IoT gadgets can communicate without exposing them to the public internet. It’s like building a private clubhouse for your tech toys, where only invited guests (your devices) can hang out.
Now, why is this important? Well, when you’re working with IoT devices, security is key. Without proper isolation, you’re leaving your gadgets vulnerable to cyber threats. That’s where VPC comes in—it creates a shield around your network, keeping prying eyes out while allowing your devices to interact seamlessly.
And guess what? You can do all this on AWS for free! The AWS Free Tier offers enough resources to get started without breaking the bank. So whether you’re building a smart home system or monitoring weather data, a remoteIoT VPC network ensures everything runs smoothly and securely.
Raspberry Pi Basics for IoT
Let’s talk about the star of the show—your Raspberry Pi. This tiny yet powerful device has become a favorite among IoT enthusiasts for good reason. It’s affordable, versatile, and packed with features that make it perfect for running IoT applications.
Here’s a quick rundown of why Raspberry Pi is ideal for IoT projects:
- Low power consumption
- Support for multiple operating systems
- Built-in GPIO pins for connecting sensors and actuators
- Community support and tons of tutorials
But here’s the thing—just having a Raspberry Pi isn’t enough. To truly unlock its potential, you need to connect it to a robust network infrastructure. That’s where our trusty VPC comes into play. By integrating your Raspberry Pi with AWS VPC, you create a powerful setup capable of handling complex IoT workloads.
Read also:Attackertvtv Your Ultimate Streaming Destination For Actionpacked Entertainment
Choosing the Right Raspberry Pi Model
Not all Raspberry Pi models are created equal. Depending on your project requirements, you might want to choose a specific model. For example:
- Raspberry Pi 4: Best for heavy-duty tasks requiring more processing power.
- Raspberry Pi Zero: Ideal for lightweight projects with minimal resource needs.
Remember, the model you pick will influence how your VPC network performs. So make sure you select one that aligns with your project goals.
Understanding AWS Free Tier
Now let’s talk about the elephant in the room—cost. Setting up a remoteIoT VPC network doesn’t have to break the bank, thanks to AWS Free Tier. This program offers a generous amount of free resources for the first year, making it perfect for beginners and hobbyists.
Here’s what you get with AWS Free Tier:
- 750 hours per month of EC2 Linux or Windows t2.micro instances
- 15 GB of data transfer out per month
- 5 GB of S3 storage
- 20 GB of VPC data transfer
These resources should be more than enough to get your IoT project off the ground. Plus, once you’re comfortable with the setup, you can always upgrade to paid services if needed.
Why Use VPC for RemoteIoT?
So why bother with VPC anyway? Isn’t a regular network good enough? Not quite. Here’s why VPC is essential for your remoteIoT setup:
- Security: VPC provides an extra layer of protection by isolating your IoT devices from the public internet.
- Flexibility: You can customize your network settings to fit your project’s unique needs.
- Scalability: As your project grows, VPC allows you to easily add more devices and resources without compromising performance.
In short, VPC gives you the tools to build a secure, efficient, and scalable IoT network. And who wouldn’t want that?
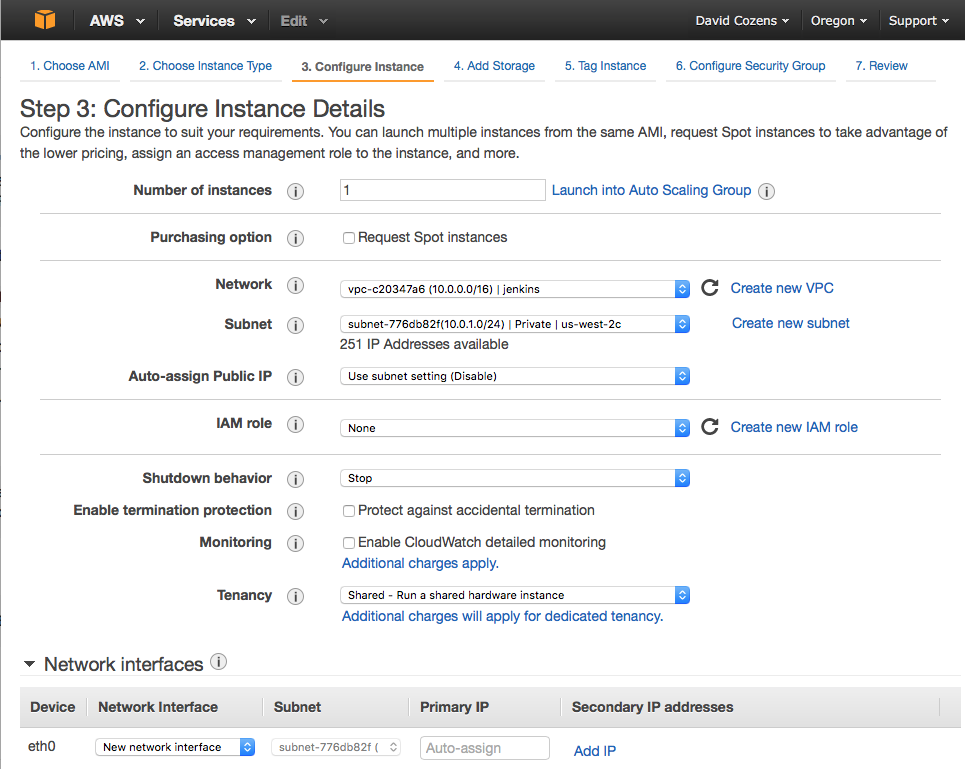
Setting Up Your VPC Network
Ready to roll up your sleeves and get started? Setting up a VPC network on AWS is easier than you think. Follow these steps:
- Log in to your AWS Management Console.
- Go to the VPC dashboard and click on "Create VPC."
- Enter a name for your VPC and set the IPv4 CIDR block (e.g., 10.0.0.0/16).
- Configure subnets and routing tables as needed.
- Launch an EC2 instance within your VPC.
And just like that, you’ve got yourself a shiny new VPC network ready for action. Of course, there’s more to it than just these steps, but this should give you a solid starting point.
Best Practices for VPC Setup
While setting up your VPC, keep these tips in mind:
- Use separate subnets for different types of traffic (e.g., public vs. private).
- Enable VPC Flow Logs to monitor network activity.
- Set up security groups to control access to your instances.
These practices will help ensure your VPC network remains secure and efficient.
Connecting Raspberry Pi to VPC
With your VPC network up and running, it’s time to connect your Raspberry Pi. Here’s how:
- Install the AWS CLI on your Raspberry Pi.
- Configure your Pi to communicate with your VPC using SSH.
- Set up port forwarding to allow communication between your Pi and EC2 instance.
It might sound complicated, but trust me, it’s doable. There are plenty of resources online to guide you through each step.
Common Issues and Solutions
As with any tech project, you might run into some hiccups along the way. Here are a few common issues and how to fix them:
- Connection Errors: Double-check your security group settings and ensure the necessary ports are open.
- Slow Performance: Optimize your network configuration and consider upgrading your EC2 instance type.
Staying proactive about troubleshooting will save you a lot of headaches down the road.
Securing Your RemoteIoT Network
Security is always top of mind when it comes to IoT, and securing your remoteIoT VPC network is no exception. Here are some strategies to keep your network safe:
- Regularly update your Raspberry Pi’s software and firmware.
- Use strong, unique passwords for all devices and accounts.
- Implement multi-factor authentication wherever possible.
By taking these precautions, you’ll significantly reduce the risk of unauthorized access and potential breaches.
Encryption Best Practices
Encrypting your data is another crucial step in securing your network. Consider the following:
- Use SSL/TLS for encrypting data in transit.
- Store sensitive information in encrypted volumes.
Encryption might seem like overkill, but trust me, it’s worth the effort.
Optimizing Performance
Once your remoteIoT VPC network is up and running, it’s time to focus on performance optimization. Here are a few tips:
- Monitor network traffic using tools like CloudWatch.
- Optimize your EC2 instance settings for better performance.
- Use caching techniques to reduce latency.
By fine-tuning your setup, you’ll ensure your IoT applications run smoothly and efficiently.
Scaling Your Network
As your project grows, you’ll likely need to scale your network. Here’s how:
- Add more subnets to accommodate additional devices.
- Upgrade your EC2 instance type for increased processing power.
- Implement load balancing to distribute traffic evenly.
Scaling your network doesn’t have to be scary—with the right tools and strategies, you can handle growth with ease.
Real-World Applications
Now that you’ve got the technical side covered, let’s talk about real-world applications. Here are a few examples of how remoteIoT VPC networks can be used:
- Smart Home Automation: Control lights, thermostats, and security systems remotely.
- Environmental Monitoring: Collect data on temperature, humidity, and air quality.
- Industrial IoT: Monitor machinery performance and predict maintenance needs.
The possibilities are endless—what will you create?
Troubleshooting Tips
Finally, let’s wrap up with some troubleshooting tips. If you encounter issues with your remoteIoT VPC network, try the following:
- Check your security group rules for misconfigurations.
- Review your VPC Flow Logs for suspicious activity.
- Reach out to AWS Support for assistance if needed.
Remember, troubleshooting is all about staying calm and methodical. With a little patience and persistence, you’ll overcome any challenges that come your way.
Conclusion
And there you have it—a comprehensive guide to mastering remoteIoT VPC networks on Raspberry Pi with free AWS services. Whether you’re a seasoned pro or a total newbie, this setup offers endless possibilities for your IoT projects. By following the steps outlined in this article, you’ll be well on your way to creating a secure, scalable, and efficient IoT network.
So what are you waiting for? Dive in and start experimenting! And don’t forget to share


